Doing bathroom renovation is not an easy endeavor, but we all have to do it at one point in our lives. As far as regular renovation tasks go, most of them include some sort of dismantling or other complicated maneuvers. However, you can fix a leaking shower without removing your tiles, or as a matter of fact – without doing too much renovation at all.
With the following article, I’d like to encourage you to be proactive and approach this issue before it gets out of hand. If you manage to notice and localize the leaks in the shower, not only will you save a lot of money instantaneously – but you get to prevent all sorts of water damage that occurs if problems like these go unchecked. This whole ordeal is best carried out by professionals, but you can also give it a good old DIY try.
Shower Leaking – How and Why Does It Happen?
 There is no perfect structure out there. We, as a civilization, have come to a point where we can build quickly and efficiently, but nothing is perfect, and – you can’t go against nature. While it does sound a bit overly dramatic, nature is the reason why your shower is going to start leaking at one point. Confused? Let me elaborate.
No material is timeless. So, the first reason why the space between tiles starts failing is the very nature of grout and grouting in general. The grout material is doomed to fail at one point, thanks to several major factors:
- Physical damage – water and, well, our bodies stepping on the floor constantly damage the grout between the tiles. While the tiles themselves can easily endure this type of pressure, the grout can’t.
- Water damage – thanks to its liquid nature, water will always find a way even through the tiniest of cracks, making them larger over longer periods of time.
- Sudden temperature drops – while this is as common as other reasons, a sudden freeze will most likely damage each and every imperfection between the tiles. Sometimes even the tiles can crack if there is too much frozen water underneath.
- Structural movement – believe it or not, buildings and structures move all the time. We don’t notice this, but the effects are shown on the weakest critical spots, like the grout between the shower tiles.
As you can see, there are many causes that lead to a leaking shower. Of course, you can fix these issues once they gain traction, but you can also take a different route. A lot of people renew the protective layers that cover the tiles and replace the batch of tiles between them. I always say – an ounce of prevention is worth a pound of cure!
How to Fix a Leaking Shower Without Removing the Bathroom Tiles?
The process of renewing the grout, including the protective layer, is not that complex. However, if this whole ordeal sounds intimidating, or if you just can’t spare the time to be bothered at the moment, I recommend you call the professionals.
And, if you do opt for a DIY solution, here’s how to approach the problem of a leaking shower:
1. Prepare the equipment
People often underestimate the value of adequate preparation. I always stress out the importance of being prepared for the unforeseen, even when it comes to bathroom-fixing tasks. So, before you jump into the whole mess (yes, it will be messy if you are new to this). Make sure to have everything you need at an arm’s length.
- Protective gear – old clothes that cover the skin of your arms and legs are a great start. You can also invest in some protective gloves and eyewear – sometimes there’s flying debris from the old grout layer
- Sealant formula – usually, the sealant will come as a one-phase or a two=phase formula. The former is pretty intuitive to use, while the latter requires you to mix the parts in some sort of ratio. Study the instruction manual on the label and do exactly as instructed.
- Something to apply the new protective layer – if the sealant doesn’t come with an adequate tool to apply it, use brushes or other similar tools that can replace it. Keep in mind, the tool you are about to use will probably seal of beyond cleaning.
- Prepare some cleaning cloths just in case, you never know what kind of mess you can make along the way.
2. Fixing a leaking shower
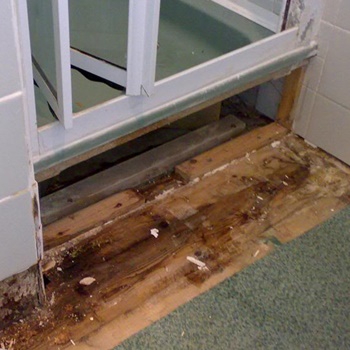
Underneath the layer of tiles and grout, there is a membrane designed to keep the water from penetrating deeper into the floor. If you notice any damage on the membrane, it would probably be best to call a professional plumber to help you out. However, these membranes are resilient and won’t break easily. Now, once you have all the gear prepared and protective gear on you, it is time to begin sealing off the leaking shower.
- Before you commence with the whole fixing process, leave the shower to dry for at least 24 hours. I know it’s tough not having a shower available at your home, but this is a small sacrifice you will have to make.
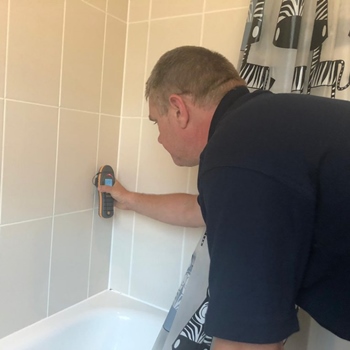
- After the shower is dry, you need to inspect the critical spots on the tiles. The spot that most often leaks is the connector joint between the shower floor and the shower wall.
- If there are any damages or cracks thicker than a strand of hair, you need to fix them first. This is done with a super-fine grout cement that can be applied with ease.
- Once the fine cracks are dealt with (that means they dried out) it’s time to address the old grout. Remove the old grout with a natural-bristle brush.
- Leave everything to dry out and start filling in the wholes. Pay special attention to the joint that connects the wall and the floor.
- Once you fixed all the major damages in the grout, it is time to apply the upper layer that will seal everything off. Apply the sealant as recommended by the manufacturer.
- Double-check for leaks and repeat if necessary. If you see that things are getting out of control, maybe the DIY approach isn’t enough.
DIY or Professional Help
 Regardless of your previous experience with plumbing (unless you are a professional plumber), one question remains – Should you DIY this issue or not?
Well, as I mentioned in the section above, the DIY approach is great if you are dealing with minor-to-intermediate shower leaks. However, things can quickly get out of control because – inadequately applied grout can damage the shower even more.
If you did everything as instructed by the sealant manufacturer and followed the beginner-friendly tutorial provided above, the leaking should stop. But if the problem persists even after you dealt with it once, there is no shame in calling a professional to deal with the issue.
A professional plumber will know exactly which type of sealant to use depending on the water quality in your area, type of tile material, old grout formula, etc.
Wrap Up
As you have seen above, there are many approaches to this complex issue. It all depends on the type and the degree of the leakage. It also depends on how soon (or late) you managed to apprehend smaller leaking holes, thus preventing all sorts of water-caused issues. Acting proactively is key when water is involved. Thanks to its nature, it will always find a way to penetrate through what may seem perfectly healthy tiles.
So, do not wait forever. If you notice even the tiniest of holes in the shower structure, act immediately and save yourself a lot of trouble down the line. These issues are known to get progressively worse as time goes by, so every day you hesitate is another potential renovation bill. Take matters into your own hands, own these issues, and fix them in time. Enjoy your comfy bathroom and every shower you take!