You’ve finished the work for the day, and nothing can relax you more than a nice, hot shower. You get home, enter the bathroom, and you notice something strange. The bathroom floor is wet. It’s not exactly a flood in there, but you can see that something is not right. After some inspection, you can see that the showerhead is dripping and that the walls are a bit moist too.
A dripping showerhead can cause a lot of problems if you don’t address the issue quickly. Besides just making noise, a dripping shower head will also cause the moisture level in your bathroom to raise significantly, which leads to condensation, and ultimately mold and health hazards. So, to keep your home (not just your bathroom) safe from mishaps like these, it is finally time to deal with that dripping shower head.
What Causes a Dripping Shower Head?
 At its core, a shower head is a simple thing – you connect it to the shower hose to maximize the potential of the water pressure coming out of the faucet. However, the sheer simplicity of a showerhead does not exactly mean that a malfunction such as a leak is always easy to solve. To make things easier, let’s discuss potential leaking sources, one by one, in an analytical fashion.
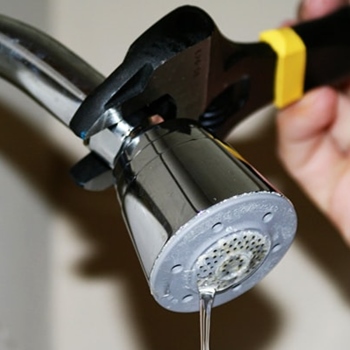
1. The shower head is dirty or clogged
Whether your shower head gets clogged mostly relies on the quality of water in your general area. To be exact – we are talking about water hardness, or in simpler terms – the amount of calcium and magnesium dissolved in the water supply. Affecting the hardness when it comes to the water coming out of a regular faucet (or shower head) is an impossible task. However, what you can do is clean the shower head using the number one cleaner in the world – white vinegar.
Here’s a simple guide on how to clean the shower head if the holes are clogged, causing it to drip or leak onto the floor.
- Make sure to turn off the water supply to the shower entirely. So, turn off the faucet, and cut off the water supply at the main valve in your bathroom. This is done for safety and convenience reasons.
- Remove the shower head by unscrewing it at its base. Here, you will see a rubber washer and a connector. Remove the rubber washer and inspect it for damages (more on that later). Put the washer somewhere safe, those things get lost easier than you think.
- Find a bowl large enough and submerge the whole shower head into white vinegar. Make sure that the vinegar enters the shower head and fills it up entirely.
- Leave the shower head to rest in white vinegar for 8 to 10 hours, depending on how the amount of sediment and minerals on it.
- Get the shower head out of the vinegar and clean the larger chunks with a damp cloth. Use a brush if needed. The vinegar makes the minerals “softer”, thus easier to remove.
2. Faulty Rubber Washers
Whenever a piece of plumbing is connected, there has to be a rubber washer involved somehow. These little rubber pieces, also known as “O rings” play the role of not letting water come out at the place where two pipes or hoses connect. Technically speaking, every joint from the shower head to the house water system should have at least rubber washers along the way – one at the shower head-to-hose connection, and the other at the hose-to-faucet connection.
The O rings endure a lot of pressure every time you take a shower, and the tooth of time bites down hard. Once the washer gets damaged, it starts leaking and dripping. The amount of water that escapes the system is not that significant, but it slowly adds up, so changing the washers is a good investment.
But, do not worry – changing a rubber washer is easier than you think. Let me give you some tips.
- If you decide to inspect and potentially change the rubber washers you need to shut off the water at the main valve in your bathroom. Again, safety first!
- Sometimes, the damage can’t be seen right away. Micro-tears in the rubber can be hard to spot, so you should always remove the rubber washer to inspect it. Even the smallest tears can cause the shower head to drip.
- If you have separate faucets for hot and cold water, to determine which one is leaking, I propose a simple test. Let the shower drip and feel the temperature of the dripping water by hand. If the water is warm, it’s time to change the hot water rubber washer and the same goes for cold water.
- Put a new rubber washer in the place of the old one, reassemble the shower head and turn the water valve on
2.1. I’ve replaced the damaged rubber washers, but the shower is still dripping. What went wrong?
If you are new to this whole concept, the chances are you did not place the new rubber washers correctly or you have the wrong size. Rubber washers need to sit perfectly to work, so it is important to get the correct size.
If the shower still leaks after the new O rings are installed, you need to check if they fit inside their designated place. Repeat the steps from above and perform another inspection. If you notice that the O ring is smaller than the socket, just get a set of fitting rubber washer and repeat the process.
3. The diverter valve is leaking
 Lastly, the issue of a dripping shower head may be in the diverter valve. A diverter valve is the “switch” that enables you to change the water flow to go from faucet-to-shower and vice-versa. The diverter valve can either be clogged (hard water again) or damaged (probably the rubber washer). And, in rare cases, it could be the cartridge valve. No matter the case, you should be able to inspect it easily.
So, here’s how to address these diverter valve issues to stop shower leaking and dripping:
- If the diverter valve has mineral waste on it due to hard water, you need to clean it with, you’ve guessed it – white vinegar. The valve can be removed easily, just remember to shut off the main water supply valve in your bathroom. Get the diverter valve out and let it rest in white vinegar. Follow the steps we talked about – let it rest, clean it, and scrub the valve if needed.
- If the valve has a worn-out or damaged rubber washer, all you have to do is to replace it with a new one. Again, make sure the rubber washer fits exactly into its designate space.
- Faulty cartridge valve – you will need pliers for this one. The cartridge is easily removable if the water is not flowing through it. All you have to do is unscrew the faucet handle and loosen the cartridge until you can pull it out with the pliers. Replace the cartridge with a new one. You can get one at any plumbing supply store. If you are not sure which one to ask for, bring the old cartridge with you for reference.
Wrap Up
Fixing stuff around the house is a special type of independence that everyone should try. Despite the popular opinion, you don’t always have to call a repairman or a plumber to fix small things around the bathroom. The sole process of dealing with a dripping shower head is a great beginning point for anyone. It is easy to apply some fixes, and if they don’t work, well, you can always replace the old shower head with a brand new one.
After all, having the opportunity to have a nice, undisturbed shower should not be a privilege, but a basic right. Showering helps us relax, set the mood for the day or night, and leave the worries behind. Take the matter into your own hands and finally stop that dripping shower head from ruining your bathroom. A bathroom is something we all use every day, why not make it a nice experience?